I have a VERY thin little boy who is only in the 3rd percentile (as in 3%, not 33%) for his weight/age. That has posed a great challenge in terms of keeping his pants up. I like the jeans that have adjustable waist bands, but he complains about how the buttons feel. We've worn out our one and only toddler belt I could find for him, so I'm suddenly obsessed with making belts!
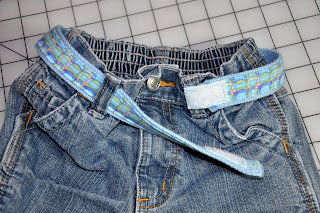
I took some pics of the first belt I made for him, but I can't find the right camera memory card that shows it, so I will showcase a belt that I made for a little girl. I gave it to my neighbor so that she could have her 4 year old daughter give it a test run. I haven't heard back yet how it worked out, but I think it should be just fine.

It was really quite simple to make (once I figured out a few reworks!). I have no step-by-step pics, but here's what I did.
First, I cut a strip of 1.75 inch wide fabric the entire length of the bolt (~44 inches). (I own a fabric store, so everything I use pretty much comes straight off the bolt.) I pressed it over on both sides so that the pattern was where I liked it and so the two sides met approximately in the middle on the back.
Next, I cut a length of 1 inch wide webbing (mine is acrylic/cotton blend) to the length I needed (about 25 inches). I cut a 1/2 inch wide by 26 inch long piece of Heat-n-Bond Lite and pressed it down the center, leaving a bit hanging off one end. I removed the paper to expose the sticky side and carefully pressed the fabric strip onto it, making sure to adjust as necessary so that it stayed centered and the pattern stayed where it should be.
I then top stitched down each side of the belt. On the end with the Heat-n-Bond hanging off, I folded the end over twice to cover the raw edges and sewed it to the back of the belt to give it a nice finished edge. On the other side, I left a couple inches of the fabric strip and sewed down the middle to secure the two sides of the raw fabric to the back of the strip. I then added a strip of Velcro (the loop part) and folded the raw fabric end under it before sewing the Velcro in place. I positioned a strip of the hook part of the Velcro opposite the loop on the back of the webbing and sewed it in place. This created an adjustable end of the belt where it can be secured around the first loop on a pair of jeans. See photo below:

Please forgive the less than perfect sewing, as this was slightly reworked and I had a little boy tugging at my leg while I was working on it! ;0)
To finish off the belt, I sewed a strip of Velcro (hook part) onto the opposite end of the belt, leaving just a little bit of room (maybe an inch at most) for the little tyke wearing the pants to grab a hold and pull the belt off herself. And finally, I added a strip of Velcro (loop part) to the region where the belt is secured to the first belt loop. See photo below:
I took some pics of the first belt I made for him, but I can't find the right camera memory card that shows it, so I will showcase a belt that I made for a little girl. I gave it to my neighbor so that she could have her 4 year old daughter give it a test run. I haven't heard back yet how it worked out, but I think it should be just fine.

It was really quite simple to make (once I figured out a few reworks!). I have no step-by-step pics, but here's what I did.
First, I cut a strip of 1.75 inch wide fabric the entire length of the bolt (~44 inches). (I own a fabric store, so everything I use pretty much comes straight off the bolt.) I pressed it over on both sides so that the pattern was where I liked it and so the two sides met approximately in the middle on the back.
Next, I cut a length of 1 inch wide webbing (mine is acrylic/cotton blend) to the length I needed (about 25 inches). I cut a 1/2 inch wide by 26 inch long piece of Heat-n-Bond Lite and pressed it down the center, leaving a bit hanging off one end. I removed the paper to expose the sticky side and carefully pressed the fabric strip onto it, making sure to adjust as necessary so that it stayed centered and the pattern stayed where it should be.
I then top stitched down each side of the belt. On the end with the Heat-n-Bond hanging off, I folded the end over twice to cover the raw edges and sewed it to the back of the belt to give it a nice finished edge. On the other side, I left a couple inches of the fabric strip and sewed down the middle to secure the two sides of the raw fabric to the back of the strip. I then added a strip of Velcro (the loop part) and folded the raw fabric end under it before sewing the Velcro in place. I positioned a strip of the hook part of the Velcro opposite the loop on the back of the webbing and sewed it in place. This created an adjustable end of the belt where it can be secured around the first loop on a pair of jeans. See photo below:

Please forgive the less than perfect sewing, as this was slightly reworked and I had a little boy tugging at my leg while I was working on it! ;0)
To finish off the belt, I sewed a strip of Velcro (hook part) onto the opposite end of the belt, leaving just a little bit of room (maybe an inch at most) for the little tyke wearing the pants to grab a hold and pull the belt off herself. And finally, I added a strip of Velcro (loop part) to the region where the belt is secured to the first belt loop. See photo below:

I have so much fabric that I'd like to perfect my technique and make some of these to sell either in my ebay store (www.woollymoose.com) and/or at craft shows. I have TONS of fabric at my disposal, so there is really no limit to the designs I can come up with. I'd love to hear comments, so let me know what you think!
As always, thanks for stopping by and God bless!


